Battery Specification Table — What You're Actually Replacing
Before you open the housing, know what you're replacing. Solar garden lights use rechargeable batteries in three common chemistries, each with distinct voltage and capacity ranges. Mismatched specifications kill charge controllers or leave lights dark after sunset.
| Chemistry | Voltage (V) | Capacity Range (mAh) | Terminal Type | Typical Life Cycles |
|---|---|---|---|---|
| NiMH | 1.2 | 600-2000 | Tab / Button | 500-800 |
| NiCd | 1.2 | 600-1200 | Tab / Button | 400-600 |
| LiFePO4 | 3.2 | 600-1500 | Tab / Wire | 2000+ |
Match chemistry and voltage exactly. A 3.2V LiFePO4 cell in a circuit designed for 1.2V NiMH will destroy the charge controller within hours. Capacity can exceed the original specification — a 2000mAh replacement in a fixture originally fitted with 1200mAh extends runtime — but never install lower capacity than the original cell. The charge controller cutoff voltage assumes a minimum capacity; undersized cells hit cutoff early and the light shuts off mid-evening.
Most "solar light battery not charging" complaints trace to chemistry mismatch, not charge circuit failure. If you replace a NiMH cell with NiCd (or reverse), the charge voltage profile doesn't match the cell chemistry. The battery appears dead because the controller never applies the correct charge algorithm.
Use this table as your diagnostic checklist. Remove the old battery, note the printed voltage and capacity, photograph the terminal orientation, then source an exact-chemistry replacement with equal or greater capacity. If the original cell has no markings, measure the resting voltage with a multimeter — 1.2V indicates NiMH or NiCd, 3.2V indicates LiFePO4.
Housing Access Without Damage — Step-by-Step Mechanical Process
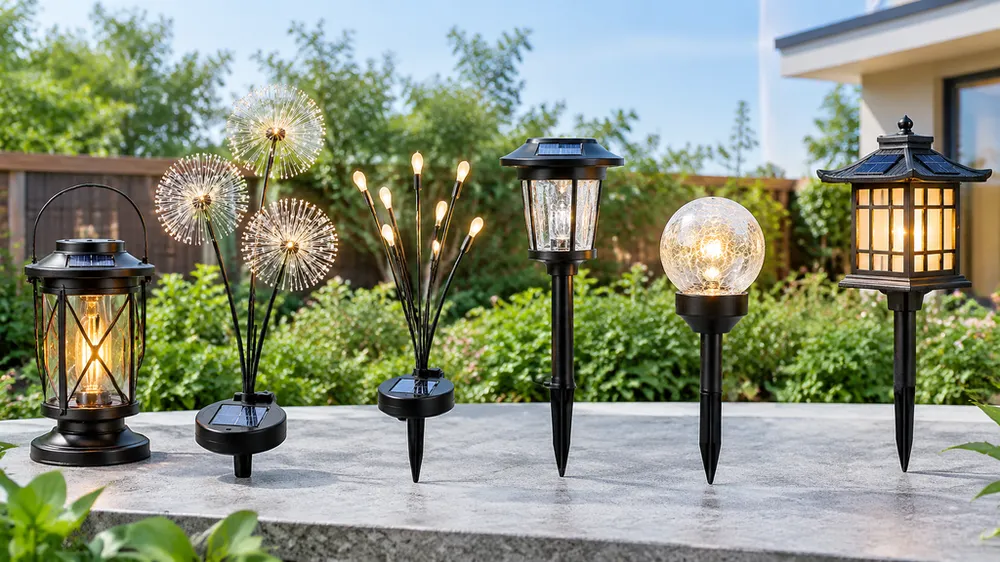
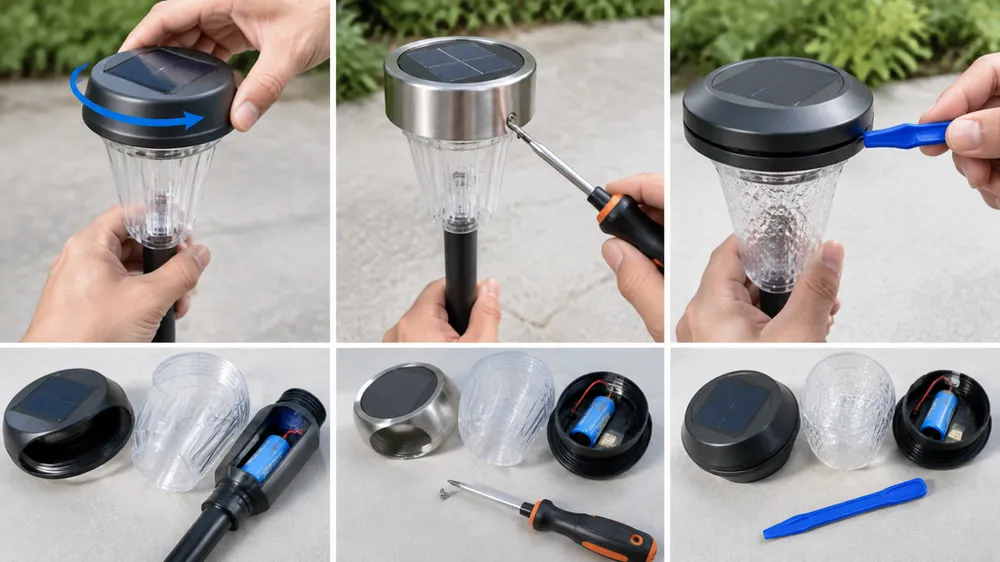
Solar garden lights use four common housing designs: twist-cap stake lights, screwed lens rings, glued lens assemblies, and snap-fit garden globes. Each requires a different opening method. Forcing the wrong technique cracks polycarbonate lenses or strips threads.
Start by discharging the light completely. Cover the solar panel with opaque tape or cloth, then leave the unit in a dark room for 24 hours. This drains the battery and ensures the LED driver circuit isn't active when you open the housing (active circuits can arc if you accidentally short terminals during battery removal).
Twist-cap stake lights: The lens or top cap threads onto the stake. Hand-twist counterclockwise. If it won't budge, wrap a rubber strap wrench (the kind used for jar lids) around the cap for grip without scratching. Never use pliers or channel locks directly on plastic housings — you'll crack the threads. If the cap still resists after moderate hand force, check for a small set screw hidden under a rubber plug or label.
Screwed lens rings: A metal or plastic retaining ring holds the lens against a gasket. Identify the screw type first — most use Phillips or hex socket screws, but some use Torx or tri-wing security bits. Use the exact bit size. Undersized bits strip the head; oversized bits crack the plastic boss around the screw hole. Remove all screws, then lift the lens straight up — don't pry sideways or you'll tear the gasket.
Glued lens assemblies: The lens is ultrasonically welded or adhesive-bonded to the housing. You'll see no screws and no obvious parting line. Use a plastic spudger (the kind used for smartphone repair) to work around the seam. Start at one edge and work slowly around the perimeter. Metal tools concentrate force and crack polycarbonate; plastic spudgers distribute pressure. Some assemblies use hot-melt adhesive that softens with gentle heat — a hair dryer on low setting for 30-60 seconds makes separation easier. If the housing won't open after working the entire seam, stop and recheck for hidden fasteners.
Snap-fit garden globes: The globe snaps into a base ring with 2-4 plastic tabs. Press the tabs inward (usually from the outside of the base) while lifting the globe. Tabs break if you pull the globe without releasing them first. If you can't feel the tabs, look for small slots or dimples in the base ring — that's where the tabs lock.
Common damage modes to avoid: cracked lenses from metal pry tools, stripped threads from wrong-sized screwdriver bits, broken snap tabs from excessive force, torn gaskets from sideways prying. If the housing won't open with reasonable hand force (equivalent to opening a tight jar lid), stop and look for a missed fastener or adhesive seal. We've seen distributors destroy 30% of a returned batch trying to force open housings that had hidden set screws under labels.

Battery Chemistry Trade-Offs — Why NiMH Is Standard and When LiFePO4 Makes Sense
Solar garden lights use three rechargeable chemistries. Each has distinct cycle life, temperature performance, and cost structure. Your replacement decision affects how long the light runs each evening and how often you'll replace the battery again.
NiMH (Nickel-Metal Hydride) is the industry standard. Operating range -20°C to +50°C covers most temperate climates. Cycle life 500-800 full charge/discharge cycles translates to 18-30 months in daily solar use. Self-discharge rate 15-20% per month means lights stored over winter need a full charge cycle before redeployment. Cost is the baseline — NiMH cells are the reference point for pricing all other chemistries. We use NiMH in 90% of production because the performance envelope matches typical outdoor lighting duty cycles and the supply chain is mature.
NiCd (Nickel-Cadmium) is legacy chemistry. You'll find it in lights manufactured before 2015. Memory effect (capacity loss if repeatedly charged before full discharge) makes NiCd unsuitable for solar applications where partial discharge is common. EU RoHS directive restricts cadmium; North American markets followed with similar regulations. If you're replacing a NiCd cell, switch to NiMH — same 1.2V voltage, no regulatory risk, no memory effect, and usually higher capacity in the same package size. Don't source new NiCd cells for solar lighting deployments.
LiFePO4 (Lithium Iron Phosphate) delivers 2000+ cycles, 3-4× the life of NiMH. Flat discharge curve maintains full LED brightness until the cell is 90% depleted (NiMH brightness drops gradually as voltage sags). Self-discharge under 5% per month means lights stored for a full year still have 50%+ charge. The trade-off is cost — LiFePO4 cells run 3-4× the price of equivalent-capacity NiMH — and charge controller compatibility. LiFePO4 requires a different charge voltage profile (3.6V for a 3.2V cell vs. 1.4-1.5V for a 1.2V NiMH cell). You can't drop a LiFePO4 cell into a circuit designed for NiMH without replacing the charge controller.
Application decision framework: Use NiMH for general-purpose retail solar lights and project installations where access for battery replacement is straightforward. Use LiFePO4 for remote installations where replacement labor cost exceeds the battery price delta — think solar lights on 40-meter poles, lights in gated resort properties, or pathway lighting in industrial sites where accessing each fixture requires a lift truck and two workers. We offer LiFePO4 as a factory option for distributors building premium or commercial-grade lines; it's not a field retrofit for consumer-grade fixtures.
One note on cold-climate performance: "solar garden light stopped working" complaints in winter often trace to NiMH capacity drop at low temperatures. A 1200mAh NiMH cell delivers 720-840mAh at -10°C, sometimes below the charge controller's minimum threshold. The battery isn't dead — it's out of spec for the temperature. If you're replacing batteries in lights deployed in cold climates (Canada, northern Europe, high-altitude regions), specify low-temperature NiMH cells rated to -30°C or switch to LiFePO4, which maintains 90%+ capacity down to -20°C.
Replacement Procedure and Circuit Protection
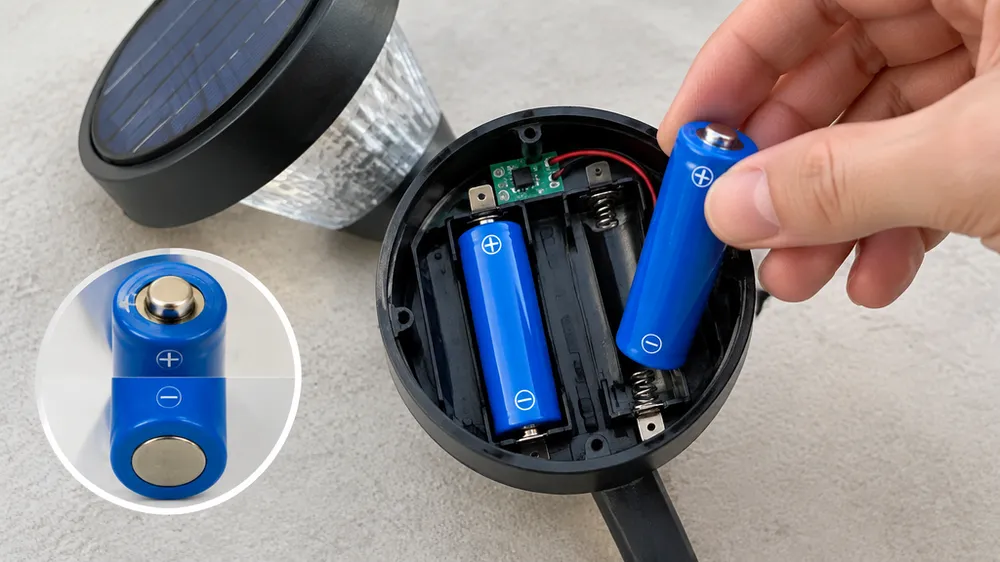
Disconnect the old battery only after you've documented the terminal orientation. Polarity reversal destroys charge controllers instantly — MOSFETs fail shorted, not open, so the damage isn't visible until you reconnect power and the circuit draws maximum current until something burns. Take a close-up photograph of the battery in place, clearly showing which terminal connects to which wire color. Most solar lights use red for positive, black for negative, but we've seen white, blue, and yellow wires in off-brand fixtures.
Check for inline fuses or thermal cutoffs before removing the battery. Some fixtures place a 1-2A fuse in series with the battery; others use a thermal cutoff (looks like a small disc with two wire leads) that opens the circuit if the battery overheats during charging. If you see either component, test it with a multimeter in continuity mode. A blown fuse or open thermal cutoff will prevent charging even after you install a new battery.
Clean the battery terminals and PCB contact pads before installing the new cell. Oxidized copper develops a thin insulating layer that blocks charge current. The light may work on battery power (the discharge circuit pushes enough current to overcome the oxide layer) but won't charge. Use isopropyl alcohol (90%+ concentration) and a nylon brush — not steel wool, which leaves conductive particles that can short adjacent traces. Let the contacts air-dry completely before reconnecting the battery.
Install the new battery with exact polarity match. Press the terminals firmly into the contact clips or solder pads — loose connections create high resistance that limits charge current. Route the battery leads so they won't be pinched when you close the housing. Pinched insulation eventually cracks, exposing bare wire that shorts against the metal housing or other components.
Close the housing and verify the gasket seats evenly all around the perimeter. Gaps let water in; water on the PCB causes corrosion that kills the circuit within weeks. If the original gasket is compressed or torn, replace it — gasket material is silicone or EPDM rubber, available from any industrial supply house.
Post-installation test: Cover the solar panel completely (use opaque tape, not just your hand — hands leak infrared that some panels detect). The light should activate within 10-30 seconds. Uncover the panel in daylight. If the fixture has a charging indicator LED, it should illuminate within 5-10 seconds. If there's no indicator LED, measure voltage across the battery terminals with a multimeter — you should see 1.4-1.5V for NiMH (or 3.6-3.7V for LiFePO4) within 5 minutes of uncovering the panel under full sun.
If the light doesn't activate after covering the panel, or doesn't charge after uncovering it, the problem isn't the battery. Measure voltage at the battery terminals during daylight with the panel uncovered. If the voltage stays at resting level (1.2V for NiMH, 3.2V for LiFePO4) after 6 hours in full sun, the charge controller or solar panel has failed.
Why Factory Battery Matching Reduces Replacement Frequency
Consumer-grade solar lights use batteries straight from bulk packaging with no performance verification. Capacity tolerance on a typical 1200mAh NiMH cell is ±10%, so actual delivered capacity ranges from 1080mAh to 1320mAh. Internal resistance tolerance is ±20%, meaning some cells in the same batch have 20% higher resistance than others. High internal resistance reduces charge efficiency (more energy lost as heat during charging) and accelerates capacity fade under cycling. Lights fail early not because the battery chemistry is wrong, but because the specific cell was out of spec when installed.
At JXSOL, we batch-test incoming batteries for capacity and internal resistance before releasing them to assembly. Capacity test is a full discharge at 0.2C rate (240mA for a 1200mAh cell) down to the manufacturer's specified cutoff voltage, usually 1.0V for NiMH. We record the actual delivered capacity. Internal resistance test uses AC impedance measurement at 1kHz — this correlates with DC resistance under load but takes 2 seconds per cell instead of 5-6 hours for a full discharge test.
Only cells within ±5% capacity tolerance and ±10% internal resistance tolerance move to production. Cells outside that window go back to the supplier or get diverted to non-critical applications (battery test equipment, lab use). This matching extends field life from 18-24 months for unmatched cells to 36-48 months for matched cells, using the same chemistry and same usage pattern.
The cost impact is real but small: testing adds approximately 8 minutes of labor and equipment time per 100 cells, equivalent to $0.12-0.15 per fixture in a product with a 1200mAh battery. Distributors pay that cost once at order time. Without matching, they pay 2-3× that amount in return logistics, customer service, and reputation cost when 30-40% of a batch fails in the first 18 months.
If you're sourcing solar lighting for resale or project deployment, ask the factory whether they test and match batteries. It's a yes/no question with documentation: matched cells come with batch test reports showing the capacity and resistance distribution of the lot. If the factory says "we use high-quality batteries" without offering test data, they're not matching — they're relying on the cell manufacturer's spec sheet, which describes the average cell, not the actual cells in your order.
Aging Test and Pre-Shipment Inspection — The Upstream Failure Filter
Batteries fail in two modes: infant mortality (failure within the first 10-20 cycles due to manufacturing defects) and wear-out (gradual capacity fade after 400-600 cycles). Generic solar light factories ship product after visual inspection and a 10-second functional test (does the light turn on?). Infant mortality shows up as customer returns within 90 days — the battery won't hold a charge, or it charges but the light only runs for 30-60 minutes instead of the rated 8-10 hours.
We run a 3-cycle aging test on every production batch before shipment. The protocol: full charge at 0.1C rate to manufacturer's specified voltage (1.45V for NiMH), rest 1 hour, discharge at 0.2C rate to cutoff voltage (1.0V), rest 1 hour, repeat. Three full cycles take 36 hours. We measure capacity on the first and third discharge. Cells that lose more than 5% capacity across three cycles, or that show voltage sag exceeding 0.1V under 1C load (simulating the LED driver's peak current draw), are rejected.
This catches weak cells with high internal resistance, cells with improperly formed electrode structures, and cells with contamination that causes elevated self-discharge. All three defect types pass a single-cycle functional test but fail under repeated cycling. By filtering them at the factory, we move the failure point from the customer's site to our inspection lab, where the cost to replace a defective cell is the cell cost plus 3 minutes of labor — not the cell cost plus return shipping, customer service time, and a damaged buyer relationship.
Most factories skip aging tests because each cycle adds 12 hours to production lead time (three cycles = 36 hours). On a 10,000-unit order, that's 1.5 weeks of additional calendar time in the production schedule. Buyers who don't ask for test reports don't get aging tests. Buyers who build aging requirements into their purchase orders get batch test reports with each shipment and see field failure rates drop from 8-12% in the first year to under 2%.
If you're evaluating factories for private-label solar lighting, ask whether their pre-shipment inspection includes battery aging tests. Request a sample test report from a previous order — it should show individual cell capacity measurements, not just a pass/fail summary. If the factory can't produce test data, they're not testing. You'll pay the difference in warranty claims.
OEM Battery Specification Control — How Distributors Lock Quality at Order Time
When you build a private-label solar lighting line, every component specification is negotiable at the order stage. Battery chemistry, brand, capacity grade, and low-temperature rating are line items in the OEM quotation. Most buyers accept the factory's standard configuration without realizing they can specify exactly which battery goes into their product.
JXSOL's OEM process separates battery specification into four negotiable parameters. Chemistry: NiMH, NiCd (not recommended), or LiFePO4. NiMH is standard; LiFePO4 adds $1.80-2.40 per fixture depending on capacity. Brand: we stock GP, Panasonic, and Fanso cells as primary suppliers, plus two backup suppliers for supply chain redundancy. Buyers can specify a preferred brand or accept factory selection based on availability. Capacity grade: a "1200mAh" cell is available in consumer grade (1080-1320mAh tested), industrial grade (1140-1260mAh tested), or premium grade (1176-1224mAh tested). Tighter tolerance costs more but delivers predictable runtime across the entire batch. Low-temperature rating: standard NiMH cells are rated to -20°C; low-temperature cells rated to -30°C add $0.35-0.50 per cell.
Most distributors don't realize capacity grade exists as a specification option. They order "1200mAh batteries" and get whatever tolerance the factory's supplier ships. A batch with actual capacity ranging from 1080mAh to 1320mAh means some lights run 9 hours, others run 11 hours, from the same product line with the same runtime claim on the packaging. Customer reviews split between "works great" and "dies too early" for identical SKUs. Specifying industrial-grade cells (±5% tolerance) costs 8-12% more than consumer-grade but eliminates the runtime variation.
Low-temperature rating matters for buyers serving cold-climate markets. Standard NiMH cells lose 30-40% capacity below -10°C; at -20°C, a 1200mAh cell delivers 720-840mAh, sometimes below the charge controller's minimum operating threshold. The light charges during the day but won't activate at night because the battery voltage sags below cutoff as soon as the LED draws current. Buyers see "solar garden light stopped working" complaints starting in November and assume the product is defective. The product is meeting its spec — the spec just wasn't appropriate for the climate. Low-temperature cells maintain 85-90% capacity at -20°C and remain functional down to -30°C. If your distribution territory includes Canada, northern Europe, or high-altitude regions, specify low-temp cells at order time. Trying to retrofit them in the field costs 10-15× more per unit than the factory upcharge.
Warranty implications: distributors who specify battery grade and temperature rating can offer longer warranty terms because they've eliminated the largest field failure mode. A 3-year warranty on a solar light with consumer-grade batteries means you'll replace 25-35% of units before warranty expiration. The same warranty with industrial-grade low-temp batteries drives replacement rate down to 8-12%. The battery cost delta ($0.50-0.80 per fixture) is smaller than the avoided warranty cost ($4-6 per replacement after you factor in return logistics and service time).
If you're negotiating an OEM order, request the battery specification sheet with brand, grade, capacity tolerance, and temperature rating clearly stated. Ask for batch test reports with each shipment showing actual tested capacity distribution. Factories that document battery specs can defend their quality claims; factories that don't are leaving your warranty exposure to chance. The commercial insight: replacing batteries in the field costs 10-15× the battery cost when you include labor, logistics, and customer service time. Controlling the spec upstream converts that unpredictable field cost into a 5-8% price delta at order time — a delta you can absorb or pass through depending on your positioning, but either way you control it instead of reacting to field failures.
When Battery Replacement Isn't the Solution — Charge Controller and Panel Failures
If you install a known-good replacement battery and the light still won't charge, the fault is upstream — either the solar panel or the charge controller has failed. Voltage measurement isolates the failure point in under 5 minutes.
Diagnostic procedure: Install the new battery, close the housing, place the fixture in full sunlight for 6 hours (no shade, no cloud cover). Open the housing and measure voltage across the battery terminals with a multimeter. For NiMH cells, you should see 1.35-1.45V (the charge controller applies 1.4-1.5V, battery resting voltage settles to 1.35-1.45V after charge current stops). For LiFePO4 cells, expect 3.5-3.65V. If the measured voltage is at or below the cell's resting voltage (1.2V for NiMH, 3.2V for LiFePO4) after 6 hours in sun, no charge current reached the battery.
Solar panel failure modes: Cracked cells are visible on close inspection — you'll see spiderweb fractures across the blue or black silicon surface. Each crack isolates a section of the cell, reducing total current output. Delamination appears as milky or clouded areas under the panel's glass or plastic cover — moisture has penetrated the laminate layers and corroded the cell interconnects. Corroded junction box terminals block current flow even if the panel itself is intact; open the junction box (usually a small plastic enclosure on the back of the panel) and inspect for green or white corrosion deposits on the solder joints or wire terminals.
Charge controller failure modes: Burned MOSFETs (the switching transistors that regulate charge current) often result from reverse polarity during a previous battery replacement — someone installed the battery backward, the MOSFET conducted full short-circuit current until it failed. A burned MOSFET usually shows visible damage (blackened package, cracked case) but not always; you'd need to desolder it and test with a component tester to confirm. Failed voltage regulator (the IC that sets charge voltage) leaves the battery either perpetually undercharged (controller outputs 1.2V instead of 1.45V for NiMH) or overcharged (outputs 1.6V+ and boils the electrolyte, you'll smell it). Corroded PCB traces are common in lights that leaked water — the copper trace develops a thin oxide layer that blocks current flow. Look for greenish or white deposits on the PCB around battery terminals and solar panel connection points.
When to replace the entire fixture: If the housing is cracked (water intrusion can't be sealed), if the charge controller has failed (replacement controllers aren't sold as spare parts for consumer-grade lights), or if the solar panel is delaminated, labor cost to repair exceeds replacement cost. Charge controllers are custom-designed for each fixture's voltage and current requirements; you can't substitute a generic part. Solar panels are available as replacements but matching voltage and current specs to the original controller is difficult without the manufacturer's design documentation.
For project buyers managing hundreds or thousands of deployed fixtures, this is why fixture-level warranty terms matter more than component specs. A 3-year fixture warranty shifts failure risk to the supplier — if the charge controller fails in month 18, the supplier replaces the entire unit. A 3-year battery warranty with no fixture warranty means you pay for a new fixture when the controller fails. When you're comparing quotes, separate battery warranty from fixture warranty and calculate total cost of ownership assuming 8-12% field failure rate over 3 years. The lowest purchase price rarely delivers the lowest total cost.