Why Standard String Light Installation Methods Damage Trees Over Time
Most solar tree light installations fail within 3–5 years — not from electrical problems, but from tree damage that contractors don't see until the warranty window closes. The wire ties and zip ties shown in consumer installation guides cause bark girdling as the trunk or branch diameter increases. For mature hardwoods with slow radial growth, visible constriction appears around year three. For fast-growing species like willows, poplars, or silver maples, you'll see bark bulging around the tie within 12–18 months.
Nail or screw penetration creates permanent bark wounds that invite pest entry and pathogen colonization. In storm-prone regions, these penetration points compromise structural integrity — the branch fails at the fastener hole, not at a natural weak point. We've seen commercial installations in coastal resort environments where nail-mounted fixtures created corrosion points that accelerated branch decay by five years compared to unstressed sections of the same tree.
Heavy fixture clusters on thin branches cause long-term stress cracks that show up as V-shaped splits in the cambium layer during the third or fourth growing season. This matters for landscape contractors specifying load limits per branch — a 3-inch diameter deciduous branch can support roughly 5–8 pounds of fixture weight before you start seeing stress indicators, but most installation guides don't mention weight distribution at all.
The commercial installation reality: contractors use whatever mounting hardware is already on the truck. When solar string lights ship without tree-safe mounting kits in the factory packaging, field crews improvise with electrical tape, bungee cords, or leftover wire from fence jobs. Product guides show installations that look fine in year one but don't warn about the damage that appears after the warranty call window closes. Your buyer's maintenance contract is where this becomes a cost problem — tree replacement or branch removal runs $800–$2,500 per tree depending on size and access, and that's before addressing the fixtures that fell during removal.
Tree-Safe Mounting Methods for Solar Lights — Hardware Selection and Placement Logic
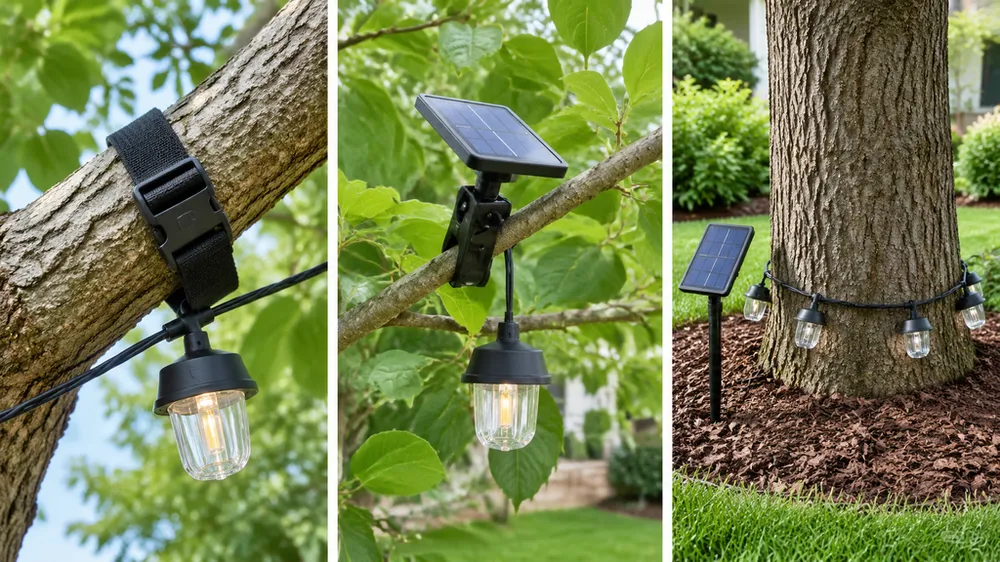
Adjustable fabric straps with 2–3 inch contact area are the baseline tree-safe method for branch-mounted fixtures. These straps distribute load across a wider bark surface, allow for radial growth without constriction, and remove cleanly without leaving abrasion marks. Material specification matters: UV-resistant nylon webbing maintains tensile strength under direct sun exposure for 5+ years, while elastic bands degrade within 18–24 months and lose tension consistency. The buckle mechanism should use a friction-lock design, not a spring clip — spring clips fatigue under thermal cycling and start slipping after 2–3 seasons.
Installation technique: wrap the strap loosely with a 1–2 finger gap between strap and bark at initial install. This gap accommodates the next 2–3 years of radial growth before adjustment is needed. Position the buckle on the branch underside to keep UV exposure off the adjustment mechanism — buckles on the top side show faster degradation from direct sun and rainfall pooling.
Clip-on branch mounts work for branches in the 1–3 inch diameter range where you need repositionable fixtures without any strap installation labor. These mounts use a spring-loaded clamp covered with rubber padding — they grip through friction, not constriction. Limitations: not suitable for high-wind areas (sustained winds over 30 mph will cause slippage), and they don't work reliably on smooth-bark species like birch or beech where the rubber pad can't get purchase. You'll also see clip failures on branches with heavy lichen growth — the pad compresses the lichen layer and loses contact with actual bark after a few wet/dry cycles.
The stake-and-drape method eliminates branch contact entirely by using ground stakes positioned around the tree perimeter with lights draped through the lower canopy. This is the best approach for young trees (under 10 years) where branch access is restricted or branch diameter is too small to safely support fixture weight. It's also the practical choice in high-traffic commercial areas where branch-mounted fixtures create head-clearance problems or vandalism risk. The tradeoff: you lose the elevated light distribution pattern that branch mounting provides, so this works better for ambient perimeter lighting than for focal tree illumination.
Common mistakes to avoid: rubber-coated wire still girdles as the tree grows (the rubber compresses but the wire core doesn't), adhesive hooks fail in heat or moisture and leave sticky residue that traps bark moisture, and bungee cords apply excessive tension with uneven pressure points that cause localized bark damage.
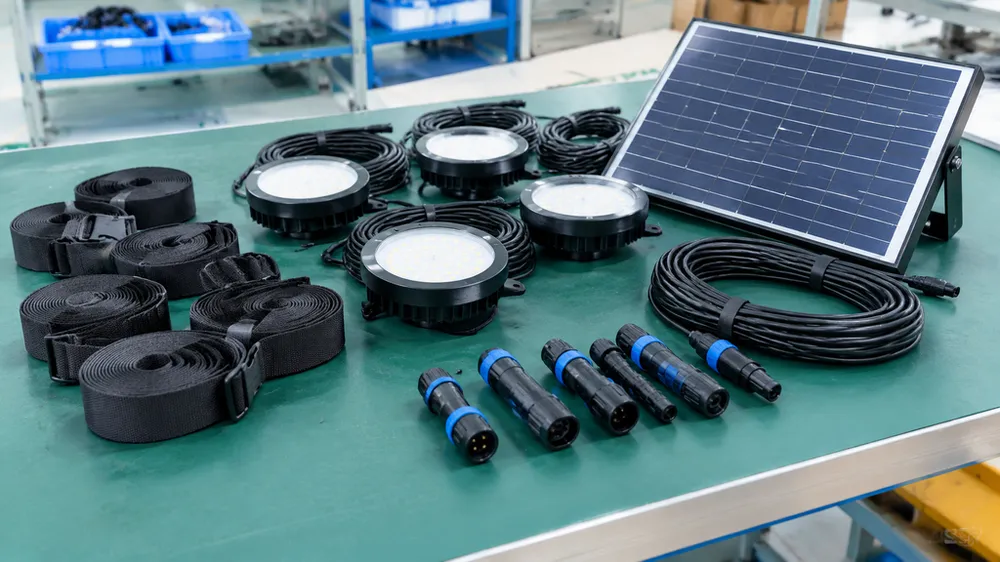
For contractors ordering 500+ units, the factory-direct approach is to request bundled mounting kits with pre-cut straps sized to your site's average branch diameter. This eliminates field measurement, reduces installation labor cost per tree, and ensures mounting consistency across multi-acre installations. At JXSOL, we can bundle custom strap lengths and widths with light units during production — you specify 2-inch or 3-inch strap width, 18-inch or 24-inch loop length, and we package them together so your crew gets installation-ready kits, not separate hardware orders that arrive on different timelines.

Step-by-Step Installation Process for Landscape Contractors
Start with a pre-installation site assessment before any fixtures leave the truck. Measure branch diameter at proposed mounting points using calipers or a diameter tape — don't estimate by eye, because a branch that looks like 2 inches often measures 2.8 inches, and that changes your strap size and weight capacity calculation. Evaluate canopy density for solar panel placement by walking the site at midday and noting where full sun reaches versus where you're getting dappled shade or full canopy cover. Identify load-bearing branches versus decorative limbs — you want branches with upward growth angles and visible connection points to the main trunk structure, not horizontal limbs that are already showing stress cracks. Check for dead wood or existing damage by looking for bark peeling, discoloration, or soft spots when you press the bark surface.
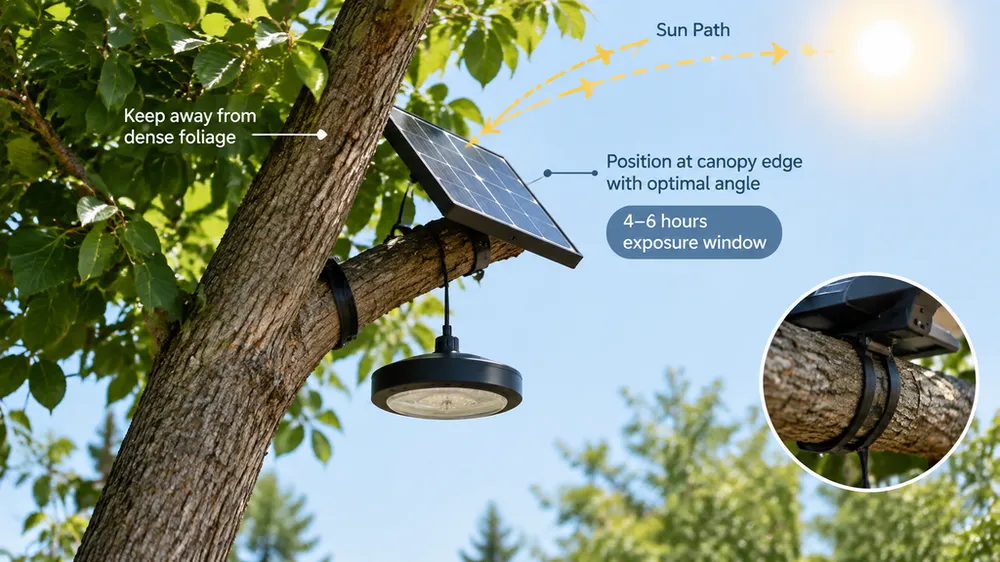
Solar panel positioning for partial-shade environments is where most installations fail in tree canopy applications. The minimum viable exposure is 4–6 hours of direct sun daily — below that threshold, battery charge rate drops low enough that you'll see runtime failures after 2–3 consecutive cloudy days. Angle the panel away from the densest canopy section and orient it toward the south-facing exposure (northern hemisphere) or north-facing (southern hemisphere) where seasonal sun path gives the longest daily charge window.
Seasonal sun path shift matters more than most contractors account for: summer sun at 70–80 degree elevation clears more canopy than winter sun at 25–35 degree elevation, so a panel position that works in June may fail in December. If you're installing in spring for a summer event, test panel charge rate for 3–4 days before committing to final placement. If the canopy is too dense to get 4+ hours anywhere on the tree, use extension cables to place the panel outside the canopy — we ship solar lights with 10-foot standard cables, but for custom orders over 500 units we can provide 25-foot or 40-foot cable lengths that let you run the panel to an adjacent open area or fence line while keeping fixtures in the tree.
Fixture spacing and weight distribution requires calculating total fixture weight per branch before you start hanging lights. Multiply individual unit weight by the quantity you're planning to hang on that branch, then compare to the safe load limit: 5 pounds for 2-inch diameter branches, 8 pounds for 3-inch branches, 12 pounds for 4-inch branches on healthy deciduous species. If you're exceeding these limits, distribute fixtures across multiple branches or switch to lighter-weight fixture models. Leave 6–12 inches of slack between individual fixtures to avoid tension stress — if the string is pulled taut, every wind event transfers load directly to the mounting points instead of allowing the string to flex.
Multi-tree stringing across 30+ foot gaps needs intermediate support points to keep branch load manageable. Use fence posts, arbor beams, or dedicated light poles between trees rather than daisy-chaining long spans from tree to tree. Also avoid daisy-chaining solar panel connections across more than 50 feet of wire run — voltage drop reduces charge current to the furthest fixtures, and you'll see uneven runtime (first fixtures run 8 hours, last fixtures dim after 4 hours). For large installations, plan battery autonomy for the furthest fixture from the panel by calculating wire run length and voltage drop, then oversizing the battery capacity by 20–30% to compensate.
Bulk installation workflow for crews installing 50+ trees: stage all mounting hardware at each tree base before anyone starts climbing or using ladders. Use marking flags to identify pre-measured branch positions (saves 15–20 minutes per tree versus deciding placement from the ladder). Install solar panels first to confirm sun exposure before committing light fixture placement — if the panel location doesn't work, you've only wasted 5 minutes, not 45 minutes of full fixture installation. Power-on test all fixtures before leaving each tree to catch DOA units while you still have access equipment on site. Verify panel angle is generating charge by checking battery indicator LEDs (if equipped) or using a multimeter to confirm voltage output from the panel after 30 minutes of sun exposure. Inspect strap tension after the first week — thermal expansion and contraction during the first week settles straps, and some will loosen enough that fixtures sag or slip.
Installation Considerations by Tree Type and Site Environment
Deciduous versus evergreen species create different solar exposure patterns that affect both panel placement and seasonal maintenance schedules. Deciduous trees allow more solar panel exposure during winter months after leaf drop — a panel position that gets 4 hours of sun in July may get 7 hours in January, which extends battery runtime during shorter winter days. The tradeoff: you need to inspect and adjust mounting straps during the growing season as branches thicken. Fast-growing deciduous species (willows, poplars, hybrid maples) can add 0.5–1.0 inches of radial growth per year, so annual strap inspection is required to catch girdling before visible bark damage occurs. Slow-growing hardwoods (oak, hickory, mature sugar maples) may only need strap adjustment every 2–3 years.
Evergreens provide year-round shade consistency, which simplifies battery sizing — if the panel placement works in June, it will work in December. The downside: you typically need to place panels outside the canopy entirely or on the extreme south-facing edge where lower branch density allows sun penetration. For large evergreens (mature pines, spruces, firs over 30 feet), the stake-and-drape method often gives better results than branch mounting because lower branches are shaded by upper canopy regardless of season.
Mature versus young tree installations have different structural constraints. Mature trees over 20 years old have slow radial growth and thick bark that tolerates strap contact well — strap adjustment intervals can extend to 2–3 years, and branch load capacity is higher per inch of diameter. Young trees under 10 years grow faster, have thinner bark that abrades more easily, and often have branch diameters too small to safely support fixture weight. For young tree installations, default to the stake-and-drape method or use clip-on mounts on the largest available branches with strict weight limits (3 pounds maximum per branch for trees under 4 inches trunk diameter).
Bark texture affects mounting hardware selection. Smooth bark species (birch, beech, young sycamore) require wider strap contact area or textured backing material to prevent slippage — a 2-inch strap on smooth bark may slip under fixture weight, while a 3-inch strap with rubberized backing holds position. Rough bark species (oak, mature pine, hickory) grip standard nylon straps well, but you need to check for abrasion points where strap edges contact bark ridges — sharp ridge edges can cut through nylon webbing over 3–4 years of thermal expansion/contraction cycling.
High-wind and coastal environments need upgraded specifications. Coastal installations face salt spray exposure (bark moisture plus salt accelerates corrosion on fixture housings and connectors), so specify IP67-rated fixtures minimum — IP65 is adequate for inland installations, but coastal moisture exposure requires full immersion protection. Increase strap width to 3 inches for high-wind load distribution, and avoid clip-on mounts entirely in areas with sustained winds over 30 mph. We've tested fixture retention in simulated wind tunnel conditions at 40 mph sustained with 55 mph gusts — 3-inch straps with double-loop configuration held position, while 2-inch straps showed 30% slippage rate after 8 hours of sustained wind.
Urban versus park setting installations have different access constraints. Urban street trees often have overhead power lines, building clearance restrictions, and limited branch access from ground level — the stake-and-drape method is more practical than bringing bucket trucks or extended ladders to each tree. Park and resort settings with open canopies and unrestricted access allow full branch mounting for optimal light distribution. One note from years of commercial installations: urban trees near parking lots accumulate more airborne contaminants on solar panels (exhaust residue, dust, pollen) than park trees, so plan quarterly panel cleaning into maintenance contracts versus annual cleaning for park installations.
Long-Term Maintenance and Seasonal Adjustment for Tree Growth
Inspection intervals should match tree growth rate and local climate intensity. Fast-growing species in high-rainfall regions need 6-month inspection cycles — check strap tension in early spring before the growing season starts and again in late summer after the main growth period ends. Mature slow-growing trees in temperate climates can extend to annual inspections. During inspection, look for bark bulging around strap edges (early indicator of girdling pressure), strap fraying from UV exposure (nylon webbing shows surface fiber breakdown before tensile failure), and buckle corrosion in humid coastal climates (salt spray accelerates metal fatigue on buckle springs and adjustment mechanisms).
Growth adjustment procedure: loosen straps by 1–2 inches if you see any compression marks on bark surface (slight indentation is tolerable, but visible bark deformation means the strap is too tight). Reposition the strap to a fresh bark section if the previous location shows abrasion or discoloration — moving the strap 4–6 inches up or down the branch distributes contact stress over a new bark area. Replace straps after 3–5 years depending on UV exposure intensity — straps in full-sun positions (top of canopy, south-facing branches) degrade faster than straps in shaded positions. We recommend keeping a 10% spare strap inventory for large installations so maintenance crews can replace degraded straps during routine site visits without ordering new hardware every time.
Seasonal panel cleaning matters more in tree canopy environments than in open-field solar installations. Trees generate pollen, sap, leaf debris, and bird droppings that accumulate on panel surfaces and block photovoltaic cells. Clean panels quarterly during spring and summer (the growing season generates the most organic debris), and inspect for sap accumulation or bird droppings after storm events when birds shelter in tree canopies. Use water and a soft brush — avoid abrasive cleaners or high-pressure spray that can damage the panel surface coating. One data point from our testing lab: a panel with 30% surface coverage from pollen and leaf debris shows a 40–50% reduction in charge current compared to a clean panel under identical sun exposure, which translates to 3–4 hours of lost runtime per night.
Battery performance monitoring becomes relevant after year three of installation. If fixtures that used to run 8 hours now dim after 5 hours, check panel exposure first (canopy growth may have introduced new shade sources), then test battery capacity. Quality fixtures use replaceable batteries — at JXSOL, our solar landscape lights use standard 18650 lithium cells that any electrician can swap in 5 minutes per fixture. Budget-grade fixtures use sealed battery compartments that require full fixture replacement when capacity degrades. For commercial installations, replaceable batteries reduce long-term maintenance cost by 60–70% compared to sealed-unit fixtures.
Storm damage response: after high winds or ice storms, inspect branch stress cracks near mounting points. Look for V-shaped splits in bark or cambium layer separation — these are indicators that branch load exceeded safe limits during the storm event. Re-tension any loose straps (wind events can pull straps slack if the branch flexed significantly), and replace fixtures with cracked housings immediately. Cracked housings allow moisture ingress that causes electrical failures within 30–90 days depending on rainfall exposure.
For landscape contractors doing annual site maintenance, bundle strap inspection with existing pruning and fertilization visits. This positions tree lighting as a low-effort add-on service (15–20 minutes per tree for strap inspection) rather than a separate truck roll, and the labor cost spreads across the main maintenance contract instead of appearing as a separate line item to the property owner.
Sourcing Tree-Safe Solar Lighting and Installation Hardware for Commercial Projects
Factory-direct sourcing changes installation economics for commercial projects. Consumer-grade solar string lights sold through Amazon or retail distribution don't include tree-safe mounting hardware — the contractor ends up buying straps separately from a different supplier, dealing with mismatched sizing (strap length doesn't match branch diameter distribution on your site), and improvising in the field when hardware runs short. Factory-direct allows custom bundling at the production level: you specify strap width (2-inch or 3-inch), strap length (18-inch, 24-inch, or 36-inch loop circumference), and buckle type (friction-lock or cam-lock), and we package them with fixtures as installation-ready kits. This eliminates the field measurement step and reduces installation labor cost per tree by 25–30% based on contractor feedback from park district installations we've supplied.
At JXSOL, our standard bundling capability starts at 500-unit orders where custom mounting kits make sense from a production setup perspective. For orders under 500 units, we can recommend compatible off-the-shelf strap suppliers, but the labor efficiency gain from pre-matched hardware only pencils out at larger scale. Lead time for bundled orders: add 7–10 days to standard production schedule for strap cutting and kit packaging (total 30–40 days from order confirmation to ex-factory date).
IP rating requirements for bark-contact moisture: trees hold moisture against bark for 6–12 hours after rainfall or heavy dew, which creates a high-humidity microclimate around any fixture in direct bark contact. IP65 rating (dust-tight, water jet resistant) is adequate for inland temperate climates with moderate rainfall. IP67 (dust-tight, immersion resistant up to 1 meter for 30 minutes) is required for coastal environments, high-rainfall tropical zones, or installations where fixtures sit in direct bark contact with limited air circulation. We verify IP ratings on in-house environmental test equipment — fixtures go into a sealed chamber with temperature cycling from -20°C to +60°C and humidity cycling from 30% to 95% RH for 72 hours, then we inspect for internal moisture accumulation. This matters for warranty claims: if a fixture fails from moisture ingress and testing shows it didn't meet rated IP protection, that's a manufacturing defect covered under warranty. If it fails because it was installed in an environment that exceeds the rated IP specification, that's a misapplication issue not covered.
Battery autonomy for partial-shade environments: standard solar landscape lights assume 6–8 hours of full sun daily, which generates enough charge for 8–10 hours of nighttime runtime. Tree canopy installations often get 4–6 hours of direct sun plus 2–3 hours of dappled shade, which cuts charge current by 30–40%. To maintain 8-hour runtime in partial shade, specify higher-capacity batteries (2000 mAh minimum for small fixtures, 3000+ mAh for larger units) or larger panel area (6V 2W minimum versus the 6V 1W panels used in standard consumer lights). Our engineering team can calculate battery sizing for your specific site: provide canopy density estimate (percent of sky visible from panel position) and latitude, and we'll recommend panel/battery combinations that maintain target runtime. This upfront engineering consultation (no charge for orders over 500 units) prevents the "it worked great in summer but failed in winter" callback issue that happens when contractors order based on peak-season performance without accounting for seasonal sun angle changes.
Custom wire length and connector type for large-tree spacing: if trees in your park or resort layout are spaced 30–50 feet apart, standard 10-foot interconnect cables force daisy-chaining and voltage drop accumulation. At 50+ feet of wire run, you'll see 1–1.5V drop depending on wire gauge, which reduces charge current to end-of-line fixtures by 20–30%. Request custom wire lengths at the factory level — we can provide 25-foot or 40-foot pre-assembled cable sections with weatherproof connectors rated IP67. This eliminates field splicing (which creates moisture entry points and voids warranty) and maintains voltage consistency across the entire installation. Custom wire length orders start at 300 units minimum and add 10–15 days to production lead time for cable assembly and testing.
Reorder consistency for phased installations: commercial projects often deploy in phases (Phase 1: 200 trees in main plaza, Phase 2: 300 trees in parking perimeter, Phase 3: 150 trees in trail system) across 1–3 years. Consumer lighting brands discontinue models every 12–18 months to chase retail trends, which means Phase 2 fixtures don't match Phase 1 appearance or performance specs. Factory-direct relationships ensure product stays in production for 3–5 years minimum — we maintain consistent LED binning, color temperature, and housing molds across multi-year reorder cycles so your Phase 2 installation matches Phase 1 appearance. For projects with planned future expansion, we can hold LED bins and component inventory for up to 2 years with a committed reorder schedule, which locks in photometric consistency even if component suppliers change.
Minimum order quantity and lead time expectations: JXSOL standard MOQ is 100 units for catalog models (no customization), 500 units for OEM/ODM with custom mounting kits or wire length. Lead time: 15–25 days for standard models in stock or production queue, 30–40 days for custom configurations that require tooling or component sourcing changes. Contractors planning spring or summer installation season should confirm orders by Q1 to allow buffer for ocean freight (add 30–45 days for West Coast US ports, 45–60 days for East Coast) and customs clearance. Air freight is available for urgent orders but adds $3.50–$5.00 per unit to landed cost depending on order size.
Warranty support for commercial installations: we provide 3-year warranty standard on solar landscape fixtures, covering moisture-related failures (relevant for bark-contact environments where humidity exposure is higher than ground-mount or pole-mount installations), battery capacity degradation beyond normal range (expected capacity loss is 15–20% over 3 years; warranty covers units that lose more than 30% capacity), and housing or connector corrosion. Warranty claim process: submit photos showing failure mode, include batch number from fixture label (we track every production batch with component traceability), and we'll ship replacement units within 7–10 days. For large installations over 500 units, we can stock a 5% spare inventory at our warehouse for next-day replacement shipping, which reduces your downtime from fixture failures during the warranty period.
Common Installation Mistakes That Cause Tree Damage or Fixture Failure
Over-tightening straps on initial installation is the most common contractor error. The logic seems reasonable — cinch the strap tight so tree movement won't loosen it — but the outcome is accelerated bark girdling. Bark compression starts immediately when the strap is too tight, and radial growth amplifies the constriction effect over the next 1–2 growing seasons. Correct practice: leave a 1–2 finger gap between strap and bark at installation, rely on buckle friction (not strap tension) to hold position, and plan for strap adjustment during the first-year maintenance visit. We've seen this mistake most often on installations where the crew is used to mounting fixtures on fence posts or poles where tight = secure, but trees are living structures that expand, and the mounting method has to accommodate that.
Electrical tape or duct tape as "temporary" solutions never stay temporary. Contractors use tape to secure loose wires, stabilize fixture housings, or supplement straps that are too short, with the intention of coming back later to do it properly. The tape adhesive bonds to bark within 48–72 hours in warm weather, and removal strips the outer bark layer along with the tape. This leaves exposed cambium that's vulnerable to pest entry and pathogen colonization. Worse, the sticky residue that remains traps moisture against the bark surface and creates a microclimate for fungal growth. No temporary tape solutions — use proper mounting hardware from day one, even if it means ordering additional straps mid-installation.
Ignoring branch load limits for fixture clustering happens when landscape designers prioritize visual impact over structural capacity. Dense light clustering looks impressive in renderings, but 15–20 fixtures on a single 3-inch branch exceeds safe load by 3x to 4x depending on fixture weight. The branch doesn't fail immediately — you see stress cracks developing over 2–3 years, starting as hairline splits in bark and progressing to cambium layer separation. By the time visible damage appears, the branch has lost 40–50% of its structural integrity. Calculate total fixture weight before finalizing the design: multiply individual unit weight (check spec sheet, don't estimate) by planned quantity per branch, compare to safe load limits (5 lbs per 2-inch branch, 8 lbs per 3-inch branch for deciduous species), and redistribute fixtures if you're over limit.
Panel placement inside dense canopy without charge testing is the main cause of "worked great for two weeks then stopped" failures. The assumption is that some sunlight filtering through the canopy will be sufficient, but dappled shade typically delivers 20–40% of full-sun charge current, which isn't enough to maintain battery charge through cloudy periods or winter months with shorter days. Always test panel charge rate for 2–3 days before committing to full installation — use a multimeter to measure panel output voltage and current at midday, compare to nameplate ratings, and relocate the panel if you're getting less than 60% of rated current. For large installations, test one tree completely before deploying across all trees to catch shade problems early.
Skipping the post-installation inspection after the first week leads to preventable fixture losses. Thermal expansion and contraction during the first week settles straps — some tighten slightly, others loosen significantly depending on how branch temperature cycles between day and night. Straps that loosen by more than 1 inch can allow fixtures to slip down the branch or rotate out of position, and wind events during that first week can pull fixtures off entirely. Schedule a 1-week callback inspection into the installation contract, check strap tension on 20–30% of trees (spot-check pattern), and re-tension any straps that show movement. This 2–3 hour site visit prevents the "found fixtures on ground after windstorm" callback that costs 4x the labor to re-install compared to preventive adjustment.